A porcupine style floral support
A means of supporting plant material by using thick gauge wire to create a ‘porcupine’ or a modern style pin holder. A very versatile means of supporting plant material which can be used over and over again at any time of the year.
NB: Tips and seasonal modifications can be found below the photos.
Designed by Eileen Fantom, the ‘porcupine’ is based on an original idea of a bespoke pinholder Julie Pearson.
You will need:
Any foliage and flowers you have access to.
Woody stemmed material is idea, this can help support finer stemmed flowers.
A selection of heights with some about 2 to 3 times the height of your container.
NB The full instructions can be seen under the photos but you can also view/download them here.
Mechanics and Sundries
-
A water retaining container – a bowl, or a pot, or a mantle vase or similar to display your finished design.
-
40 to 50 long thick gauged wire – the thicker the better and about twice the height of your container
-
20 small cable ties.
-
A metal or wooden cylinder, such as a broom handle to bend the wire around.

Photo 1


Photo 3
Stage 1
1. Roll a piece of wire once around the thin cylinder to create a circle in the middle with 2 long tails – photo 1 and photo 2.
2. Create 6 of these centre looped pieces of wire – photo 3 and photo 4
3. Cable tie the 6 looped wires together – place the cable tie through one side of the loop and pull the cable tie tight. You have now formed the centre of the ‘porcupine’ – photo 5

Photo 4


Photo 6
Stage 2
4. Spread out the 6 looped wires to form a hexagon shape – photo 6
5. Continue to create more wire circles with tails until you have sufficient to fill your container – photo 7.
6. Place them in groups of 6 and leave some ungrouped.
7. Group 3 loops together and loosely tie together with a cable tie to form a triangle.
8. Insert the next wire loop into the centre of the cable tie.
9. Fit the loops together in a lattice pattern and loosely tie with a cable ties.
10. Keep adding more wire loops to create triangles (photo 3) and hexagons (photo 6)
11. Build up the structure to the size to fit in your container – it can be circular or an oblong shape


Stage 3
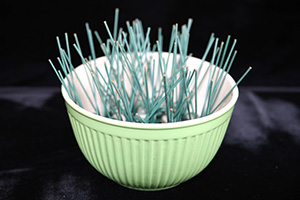
12. The ‘porcupine’ can be placed wires up or loops up in your container which every is most stable and supportive for your plant material – photo 8 and photo 9.
13. Half fill your container with fresh water.
14. Almost any shape of floral design is possible using the ‘porcupine’ structure.


Stage 4
15. In this example a mixture of garden foliage and a few spring flower have been used.
16. Use a mixture of foliage with different forms, textures, size and colours to create a balance and interest – photo
17. Start by using thicker woody stems to create an outline, with taller stems towards the back and short stems at the front – photo 11 and photo 12.
18. Use a few flowers to create a focal point – photo 13.
19. Add additional foliage to cover the ‘porcupine’ structure.
20. Woody stemmed plant material will add stability to your design.
21. Add more fresh water to your container if required.
-
Tips/seasonal modifications.
-
Don’t tie the cable ties too tight to begin with until you have 6 wired loops.
-
Pot tape may help to secure the structure to your container to give extra stability.
-
Woody stemmed foliage may need to be pushed a little harder into the wire structure as the design fills up with plant material.
-
Finer wire can be used to make the ‘porcupine’ which may be more suitable for delicate plant material and smaller containers
NB The full instructions can be seen under the photos but you can also view/download them here.